My first attempt at making Aipan was a disaster in a specific and instructive way. I had the geru right — I had watched enough people use it to know the mix should be thin enough to flow from a cloth but thick enough not to pool. What I had wrong was the rice paste. I had not soaked the rice long enough, and I had ground it too coarsely. The paste went on unevenly, clumped at the corners of every curve, and dried with a gritty surface that looked nothing like what I had seen Kumaoni women make in twenty minutes.
I am writing this guide so that your first attempt does not have to repeat that particular education. Both materials — geru and bisvar — need specific preparation, and both fail in predictable ways if the preparation is off. This guide covers both, plus the drawing technique itself.
If you want to understand what Aipan is before learning to make it, start at /aipan/what-is-aipan. For the ritual context of specific patterns, see /aipan/aipan-ritual-significance.
What You Need
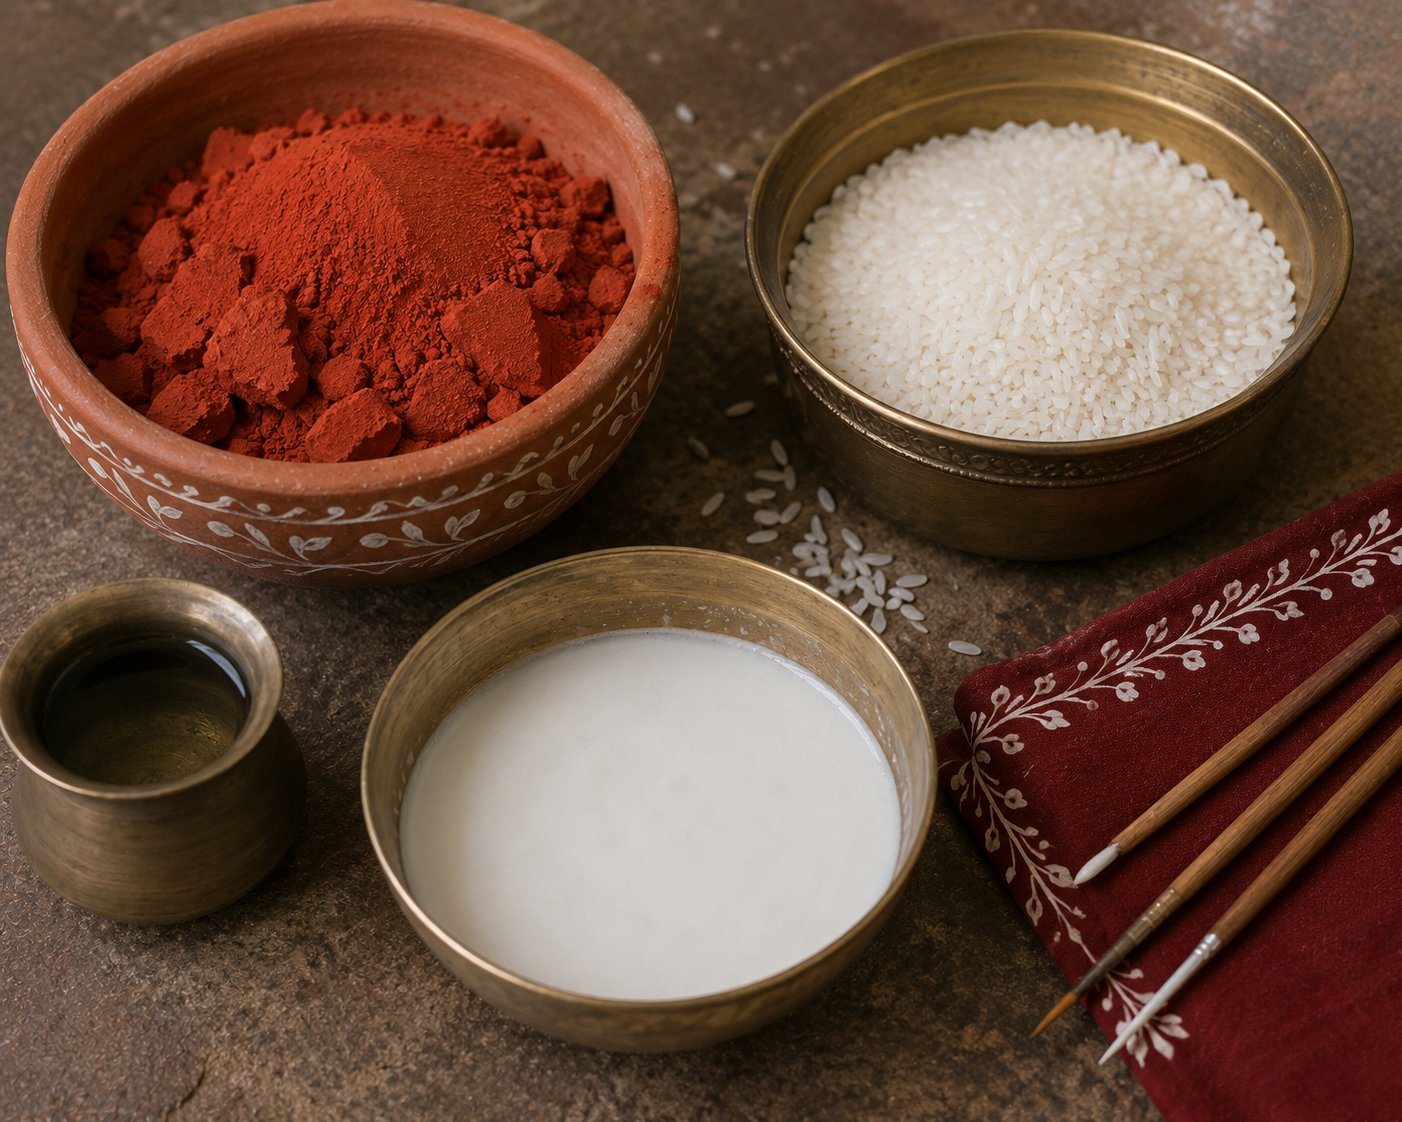
The traditional materials list is short:
Geru — red ochre powder, available from hardware shops, colour shops, or art suppliers. 50g covers roughly 1,000 cm2 of surface (about a 32 x 32 cm square) for one coat. Cost: Rs 30-50 per 100g at local shops in Almora and Haldwani; Rs 80-150 per 500g online.
Raw white rice — 100g is enough for a standard floor pattern or two medium pata pieces. Any uncooked white rice works. Do not use parboiled or instant rice.
Water — plain tap water. Cold water for soaking the rice; room-temperature water for the geru wash.
A grinding surface — a sil-batta (grinding stone) is traditional and produces the smoothest result. A household blender works but tends to produce a slightly more liquid paste that needs adjusting. A mortar and pestle is a reasonable middle option.
Applicator — traditionally the three middle fingers pressed together to form a flat tip. Some practitioners use a small cotton wick (cloth wick twisted from an old sari or cotton dupatta). For fine lines, a thin bamboo stick with a cloth tip. No brushes — the marks of a brush look different from the marks of a finger, and the traditional Aipan visual texture is made by the latter.
Surface — a mud floor, concrete floor, or wooden pata (plank). If using wood, unfinished or raw wood takes the geru better than varnished or painted wood.
Material Comparison: Traditional vs Modern Substitutes
| Material | Traditional | Common substitute | Substitute cost | Difference in result | Recommend for beginners? |
|---|---|---|---|---|---|
| Background colour | Geru (red ochre powder) | Red acrylic or poster paint | Rs 50-150 for a tube | Brighter red; less earthy; less absorbent | No — geru is easy to find, use the real thing |
| Drawing paste | Bisvar (ground raw rice paste) | White acrylic thinned with water | Rs 80-200 for a tube | Faster drying; shinier; no cracking risk; less matte | Yes — for learning the drawing technique |
| Applicator | Fingers / cotton wick | Flat watercolour brush (#6-8) | Rs 40-100 | Different stroke character; brush lines look sharper, less organic | Acceptable, but finger technique is worth learning |
| Surface | Mud floor or raw wood pata | Thick watercolour or handmade paper | Rs 20-80 per sheet | Paper holds pattern well; portable; can be framed | Yes — best practice surface for beginners |
| Geru binder | Water only | Water + small amount of fevicol (for durability on pata) | Rs 10-30 | Adds durability for display pieces; changes texture slightly | Yes — for pata that will be handled |
Step 1: Soak the Rice (6-8 Hours Ahead)
Measure 100g raw white rice into a bowl. Cover with cold water by at least 3 cm. Leave for a minimum of 6 hours; 8 hours produces a slightly smoother paste. The rice will swell to about 1.5x its original volume. Do not skip this step or try to shorten it — undersoaked rice grinds unevenly and the paste will be grainy.
If you are making Aipan for a morning occasion (Harela, Diwali morning), soak the rice the night before. If for an evening ceremony, soak from morning.
Step 2: Prepare the Geru Wash
Measure 50g geru powder into a small bowl. Add 180-200ml water gradually, mixing with a spoon or your fingers until you have a smooth liquid with no lumps. The consistency should be like thin yogurt — it should flow from a tilted spoon slowly, not pour freely. If it is too thick, it will be streaky on the surface. Too thin and it will not cover evenly and will look washed out.
Test on a scrap piece of wood or card first. Apply with a cloth, a soft brush, or your palm, spreading it in overlapping strokes. The coverage should be even and the colour should be a consistent deep orange-red when wet, drying to a darker, more matte terracotta.
Temperature note: Geru wash dries differently at different temperatures. At 25-30 degrees C (a standard Kumaoni summer day), allow 15-20 minutes. At 10-15 degrees C (winter in the hills), allow 35-45 minutes or more. Do not try to speed it with a heat gun — it can make the surface brittle.
Step 3: Grind the Bisvar (Rice Paste)
Drain the soaked rice through a strainer. Discard the soaking water. Transfer the drained rice to the sil-batta or blender.
Add 30ml of fresh water. Grind — on the sil-batta, this takes 8-12 minutes of firm circular motion, checking the paste consistency every 2-3 minutes. In a blender, pulse in 5-second bursts and check frequently. You want a smooth, thick paste — like hummus or thick cream cheese. If it is too thin, you can add a little more drained rice and grind again. If it is too thick, add water in small increments (5ml at a time).
Common mistake: Adding too much water upfront and ending up with a liquid that runs off the geru surface. Start conservatively.
The paste is ready when: a line drawn with three fingers holds its shape for at least 30 seconds without sagging. If it sags within 10 seconds, it is too thin.
Working time after grinding: 60-90 minutes before the paste begins to dry on the surface and lose its flowability. Do not grind more than you will use in that window.
Step 4: Apply the Geru Wash to the Surface
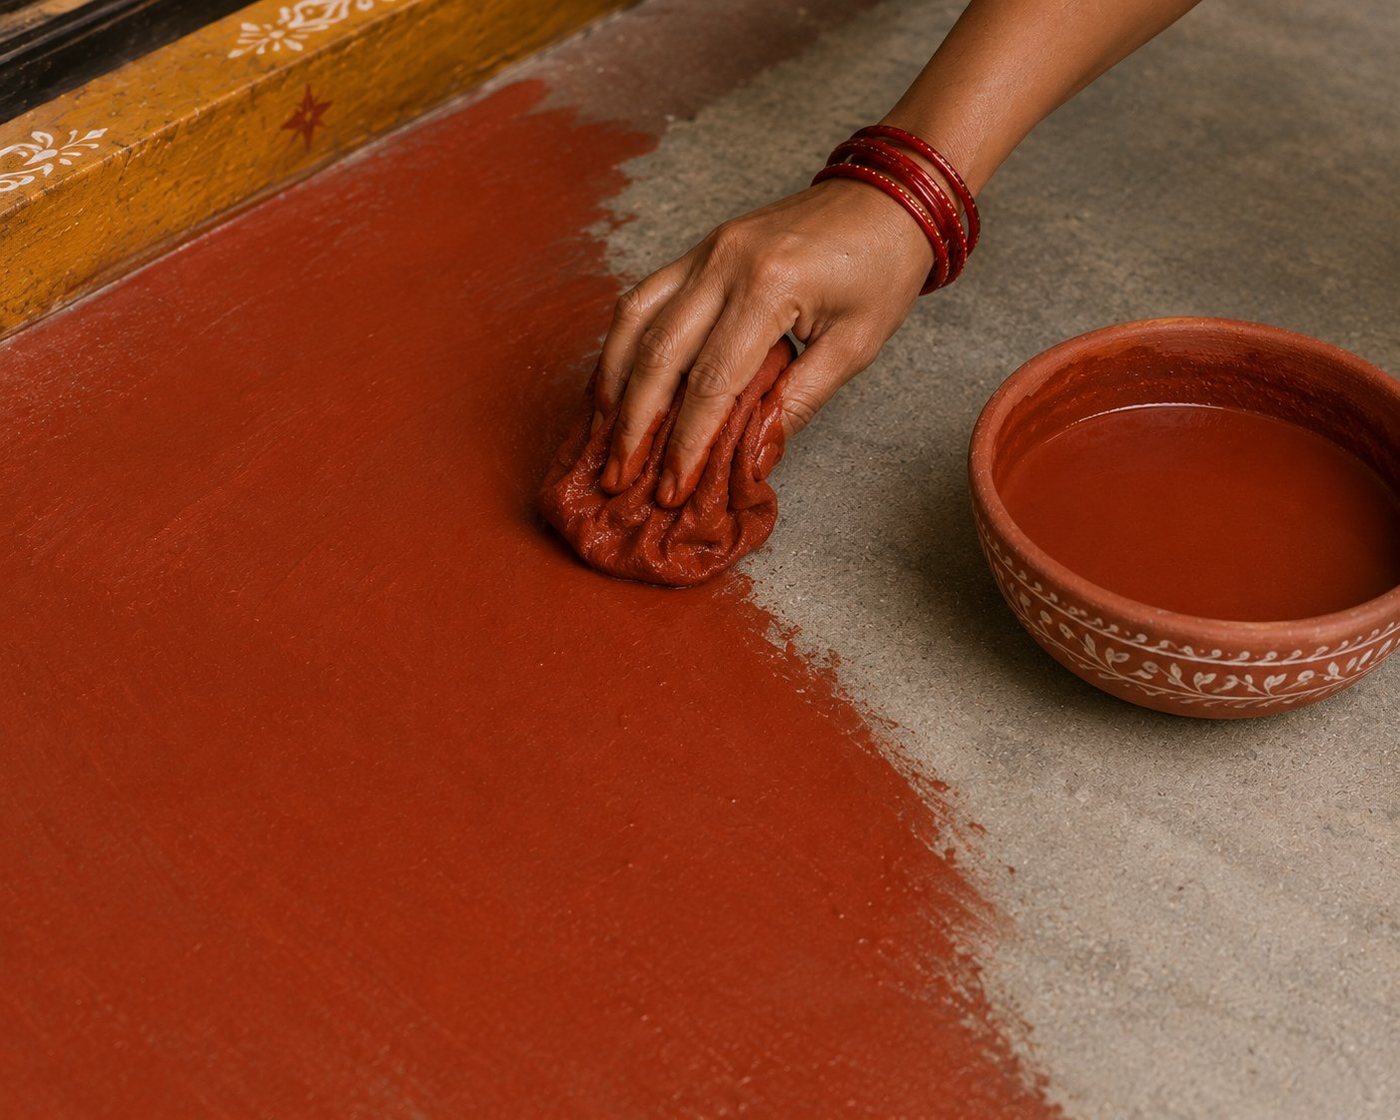
With the geru wash ready, apply it to your drawing surface. For a floor: pour a small amount directly on the floor and spread with a cloth in overlapping circles, working from the centre outward. For a wooden pata: apply with a cloth in the direction of the wood grain for the first coat, then cross-grain for the second if a second coat is needed.
A single coat is standard for floor patterns. For pata display pieces or paper, two thin coats produce a richer, more even red — apply the second coat only after the first is completely dry.
The size of the geru area determines the boundary of your composition. Traditional practitioners establish this size intuitively for each occasion. If you are learning, a 30 x 30 cm square is a good starting size for a single motif like the Saraswati Chowki lotus.
Step 5: Mark the Structure Before Drawing

This step is often skipped in tutorial descriptions, but it is what separates a balanced composition from a lopsided one. Before touching paste to geru, mark four small bisvar dots at the corners of your planned composition. Then mark the centre with a single dot. These anchors let you check proportion before committing any lines.
For the Lakshmi Pad (two feet): mark the positions of the two heel centres before drawing. They should be symmetrically placed on either side of the centre line, separated by 6-8 cm. More detail on the Lakshmi Pad drawing sequence at /aipan/lakshmi-pad.
For the Saraswati Chowki: mark the centre, then mark four points at the cardinal directions of the lotus at equal distances from the centre — these will be the tips of the four cardinal petals. More on the Saraswati Chowki at /aipan/saraswati-chowki-lotus.
Step 6: Draw — Starting Correctly
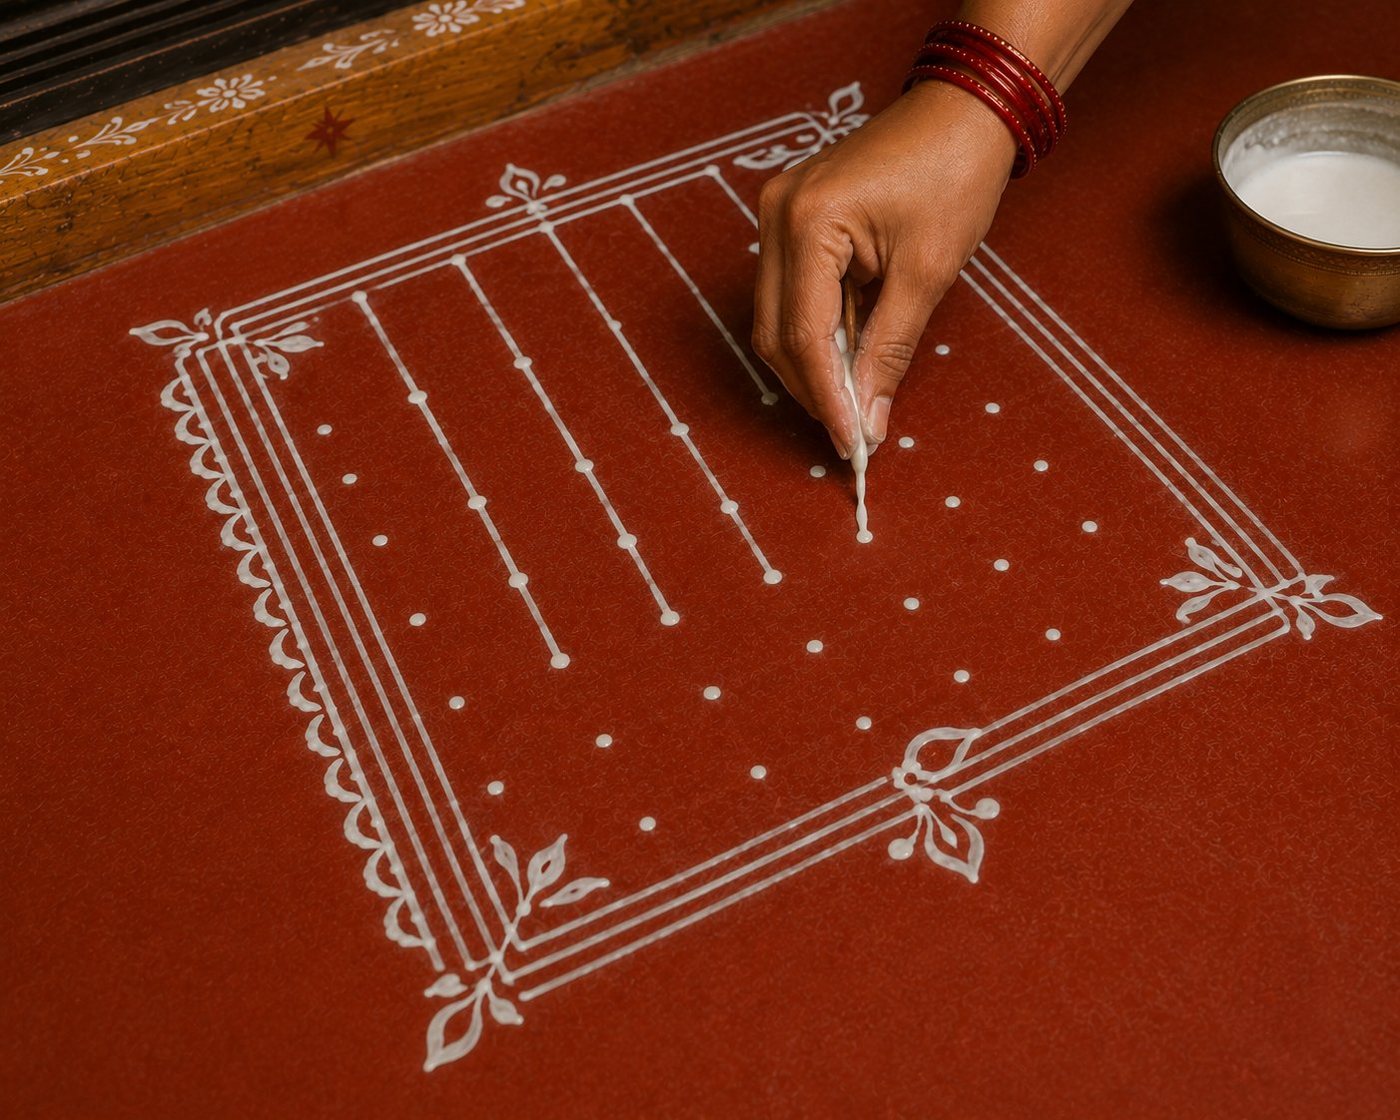
The sequence matters. Always draw the border first, then the corner elements (swastikas or diamonds), then work inward to the central motif. This is not arbitrary — if you draw the centre first, your hand will cross over it to reach the border, risking smear.
For the border: The dot chain is the most common Aipan border. Press three fingers flat into the bisvar, then press them against the geru surface in a rhythmic sequence — press, lift, move 1.5 cm, press, lift. The dots should be approximately 5-6mm in diameter and spaced by roughly 3-4mm. Consistent pressure is the key: too hard and the dots become wide smears; too light and they are hollow.
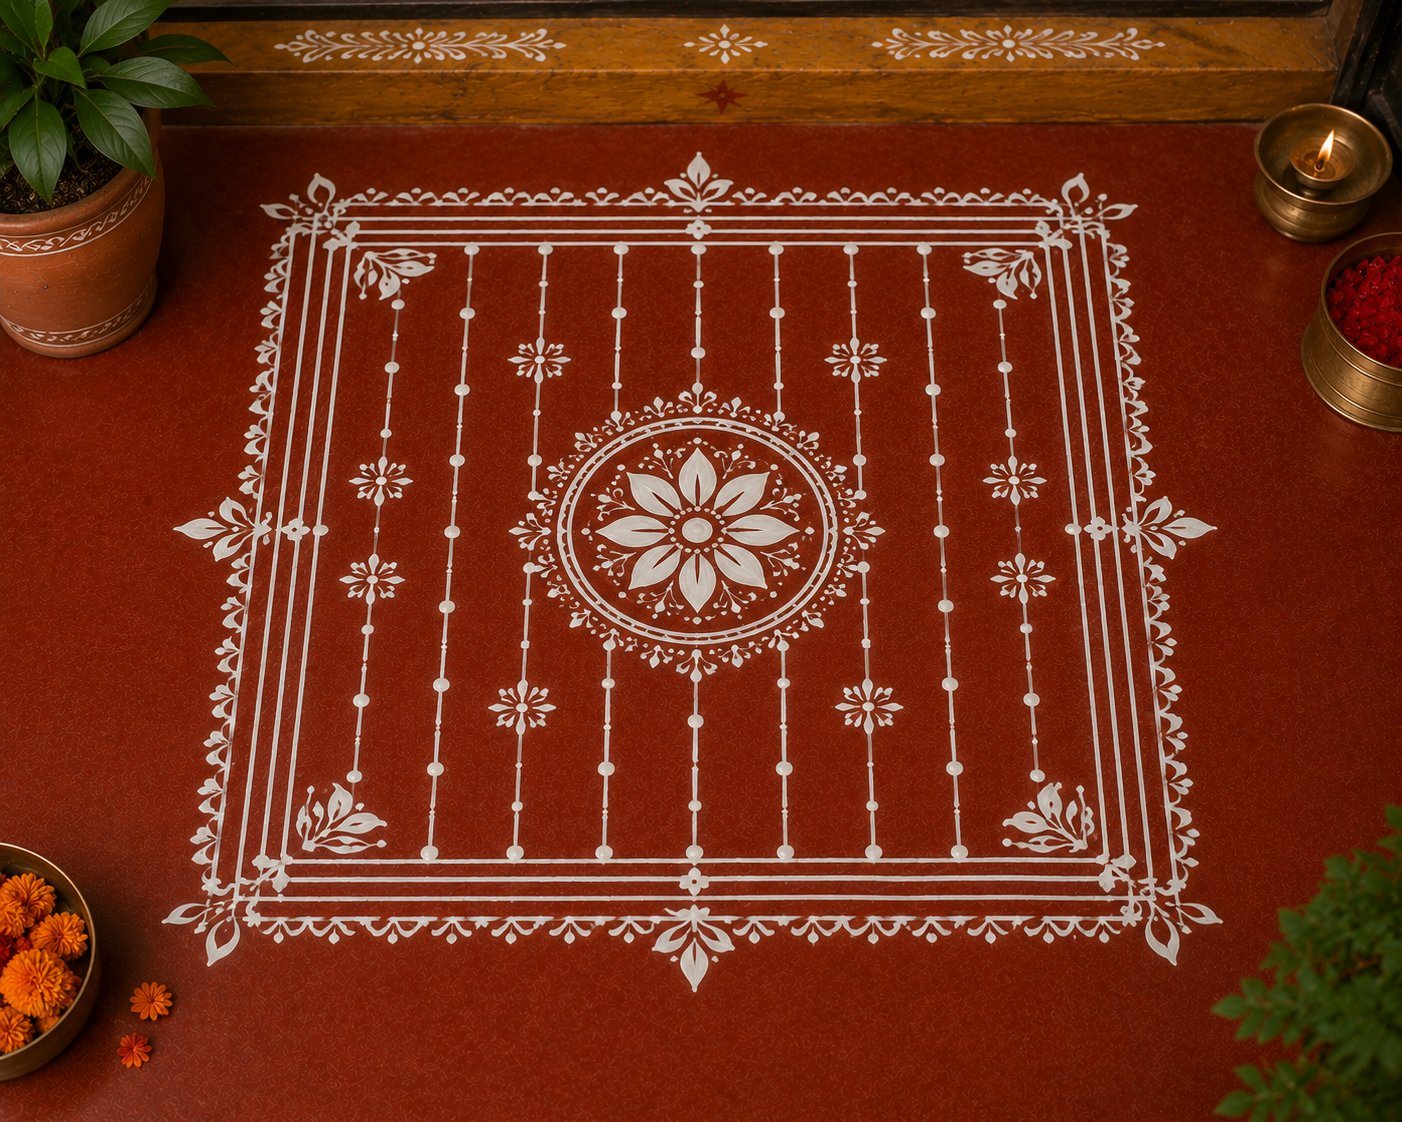
For the swastikas: Draw the horizontal arm first, then the vertical, then the four "hooks." The hooks go clockwise — right turn at top, right turn at right side, right turn at bottom, right turn at left side. The arms should be equal in length: approximately 2 cm each for a standard-scale composition.
For the lotus petals: Build each petal with a single curved stroke from base to tip, then mirror on the other side to close the ellipse. Some practitioners do it in one continuous motion; others do two half-strokes. The two-stroke approach is more reliable for beginners.
Step 7: Drying and Common Problems
Allow the completed Aipan to dry undisturbed. At 25 degrees C, the bisvar will be dry to touch in 20-30 minutes. Full drying, where it no longer smears if gently touched, takes 45-60 minutes.
Problem: cracking. Cause: paste applied too thick. Fix: for future work, thin the paste slightly. A cracked line can sometimes be touched up while still wet at the crack points.
Problem: paste spreading or bleeding. Cause: paste too thin, or geru surface not fully dry. Fix: thin the paste less next time; check the geru is fully dry (it should feel cool and dry to the back of your hand, not even slightly damp). On humid days in the monsoon season (July-September in Kumaon), allow extra drying time for the geru base.
Problem: uneven white colour. Cause: inconsistent pressure while drawing. Fix: practice the finger pressure on paper before moving to the geru surface.
Problem: bisvar paste drying out in the bowl mid-session. Cause: typical working time is 60-90 minutes. Fix: if the session runs longer, add a few drops of water to the paste bowl and mix briefly. Do not grind more fresh paste mid-session if you can avoid it — the freshly ground paste will have a different consistency from the rested paste and the lines will look different.
What to Practice First
I recommend this sequence for building from simple to complex:
Session 1: Prepare both materials and practice the dot chain border on paper. Just rows of dots until the pressure and spacing feel consistent. This is the foundational Aipan mark and everything else builds on it.
Session 2: Draw a lotus — start with four petals (cardinal directions only), then add the four diagonal petals. Add the three concentric circles at the centre. No border, no swastikas — just the lotus.
Session 3: Full small composition — dot chain border, corner swastikas, central lotus. This is the basic Saraswati Chowki structure in miniature. Target size: 20 x 20 cm.
Session 4: Lakshmi Pad on pata. Two feet, eight lotus petals, border. This adds the challenge of the foot form and bilateral symmetry.
After four sessions at the above scale, moving to a floor composition is mostly a question of scaling up — the principles are the same. The difficulty is that larger scales require more consistent finger pressure over a longer drawing time.
Where to Source Materials
In the Kumaon region: hardware and colour shops in Almora, Nainital, Haldwani, Pithoragarh, and Ranikhet all stock geru. Ask for "geru mitti" or "lal geru." Some craft supply shops in Almora's Lala Bazaar now stock prepared geru specifically for Aipan, sometimes labelled as such. Raw rice you will have at home.
Outside Kumaon: "red ochre powder" or "geru clay powder" on craft supply platforms (Amazon India, Flipkart, IndiaMART) — expect Rs 80-200 per 500g. Look for pigment-grade, not paint-grade — pigment-grade is the fine natural clay used for floor coatings.
The MSME Development Institute in Uttarakhand runs periodic Aipan training workshops through their artisan development programs — these include materials. Worth checking if you are in the region.
Full site index including festival pages and motif pages at this site. The /festivals/harela page documents the main occasion when Aipan is drawn across all of Kumaon.
FAQ
What type of rice is used for Aipan bisvar?
Any raw white rice — short-grain, long-grain, or broken rice. Parboiled or pre-cooked rice will not produce the right consistency. Raw starch is the binder; fine-grain hill rice gives a slightly smoother paste.
Where can I buy geru for Aipan?
Hardware and colour shops throughout Kumaon. Almora's Lala Bazaar has several options. Online, it is sold as "red ochre clay powder" for Rs 80-150 per 500g on craft supply platforms.
How do I stop bisvar from cracking when it dries?
Apply the paste thinly — a single thin coat. Cracking means it was too thick at that point or dried too fast in dry heat. On cold winter days above 2,000 metres, add a small amount of water to the paste just before it starts to thicken, which extends working time.
Can I use Aipan on fabric or paper?
Yes. For fabric, use a thinned geru wash base or red fabric paint. For paper, thick handmade or watercolour paper works well. The bisvar paste may need a slightly thinner consistency on fabric to prevent stiffening.
How long does Aipan last once drawn?
Floor Aipan on mud: 3-7 days depending on foot traffic and humidity. On wood (pata): weeks to months if kept dry. On paper: essentially permanent. The impermanence of floor Aipan is part of its ritual character.
Is there a modern substitute for bisvar?
White acrylic paint thinned to a thick-cream consistency is the most common substitute used in workshops. It dries faster and is more stable but does not have the matte texture of traditional bisvar. For learning technique, acrylic works. For ritual use, rice paste is traditional.